
Making A Pro Guitar Cable
Posted by Jonathan Beals on 2021 Mar 26th
People asked how we make our guitar cables, so I got Brett to film me making one for myself. I mention a couple of steps we do on customer cables that I didn't do for the cable I made for myself in the video. They are steps we take to ensure our customers receive top quality cables that are suitable for touring professionals. I'm not a touring musician. In fact, between small kids and the business I basically never have time to play guitar any more. :( I'm just not worried about flux residue or thread locker on my personal cables. But, rest assured, we would never let a cable out the door that missed those steps.
Note that this isn't a thorough tutorial on how to solder, it is just how to make a cable. We will have another video dedicated to different soldering methods in the future.
Tools required:
- Soldering station
- Flux
- 90%+ Isopropyl Alcohol (and a small cleaning brush)
- Heat gun
- Thread locker (optional)
Here is a list of the parts you'll need for this cable:
2x - Switchcraft #280 - 1/4" Mono Straight Plug
- Or another plug of your preference, but you may need to scratch the 1/2" heat shrink depending on the plug type you choose.
* - Next Gen - 20AWG Pro Instrument Cable
- Or another cable type of your preference
* - 3/8" Heat Shrink Tubing
* - 1/2" Heat Shrink Tubing
First step is to pre-load the cable with the necessary parts. Everyone who has made cables knows the importance of this step. We've all forgotten to pre-load the parts before soldering and have had to cut and re-do many cable ends as a result. Save yourself the trouble (unless you want the practice), and pre-load the parts on both ends of the cable. The 3/8" heat shrink should be strong/tight enough to hold it in place well enough for you to do your work without losing parts.
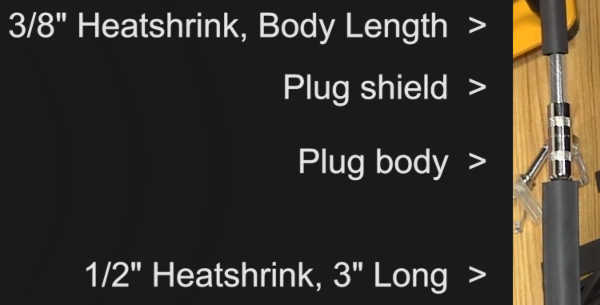
From inside to out, it goes:
- 1/2" heat shrink, 3" long
- The body of the plug with the threads facing out
- The plug's shield (that comes with the plug)
- 3/8" heat shrink, matching the length of the body.
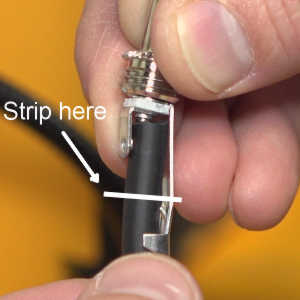
Before doing anything, I actually bend the hot lug and ground plate down on about a 10 degree angle. This shifts the hot lug down, making it easier to slide the heat shrink and shield on afterwards. It also helps with the ground connection, which I'll try to explain later.
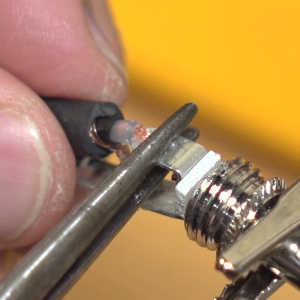
Next, we prep the cable end for soldering (can you see the lug and ground plate bent slightly, as described above?). We use the plug itself to determine where to strip back the jacket (just past the tab on the ground plate).
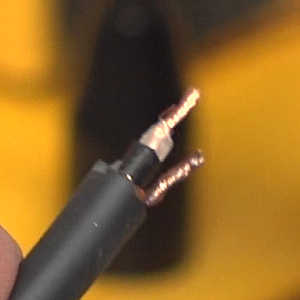
The cable end is prepped as follows:
- Ground/Shield wires pulled to one side and twisted to make a ground lead, then cut roughly 1/3rd of the way back.
- Inner black PVC shield stripped back about 2/3rds of the way
- Many don't realize that this black PVC material is actually conductive and helps with shielding. It needs to be stripped back to avoid accidentally grounding out the signal by coming into contact with the hot wires of the hot lug.
- Strip the clear jacket back about 1/3rd of the way, leaving some space between it and the black PVC, giving you enough wire to twist together for the hot lead
Then we carefully apply flux to the both wires, the hot lug, and the ground plate.
Flux cleans and scores the surfaces (because it is basically acid). It also acts as a heat conductor, drawing the heat from your soldering iron onto the parts you want the solder to bond to. This helps flow solder where you want it to flow. It also helps ensure a very good physical bond between the solder and the parts.
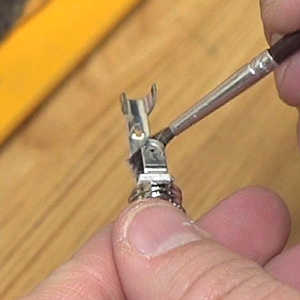
Next, we ensure there is a solid physical connection using a pair of pliers and some helping hands for assistance, then we solder the connection. The solder is only flowed onto one side of the lug, but heat is applied to both sides to help the solder flow through, permeating every bit of the wire and bonding to the lug throughout the entire joint. Be sure to hold the iron in place for long enough to burn off any excess flux (usually takes a few seconds).
DON'T BREATHE THE FUMES. It's really not good for your lungs to breathe in a cloud made of acid. Just sayin'.
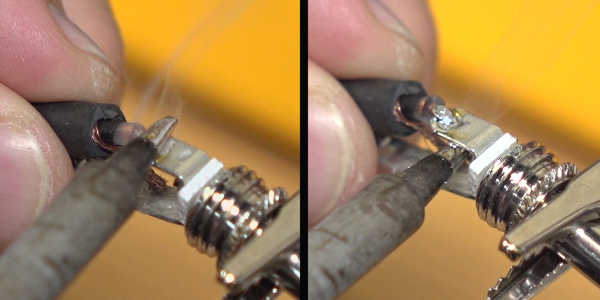
At this point, we clean the joint using 90%+ Isopropyl Alcohol to remove any flux residue. Because flux is essentially acid, it isn't a good thing to leave behind for the longevity of your joint. It is also conductive, so excess flux residue might be the cause of some signal issues if left unattended.
Next, we bend the ground plate back to straight. This digs the tab on the ground plate into the jacket, for more physical durability. It also keeps physical pressure between the plate and the ground wire, which is perfect for adding solder. The helping hands are put in place on the outer jacket and ground plate to hold everything securely while solder is flowed onto the joint.
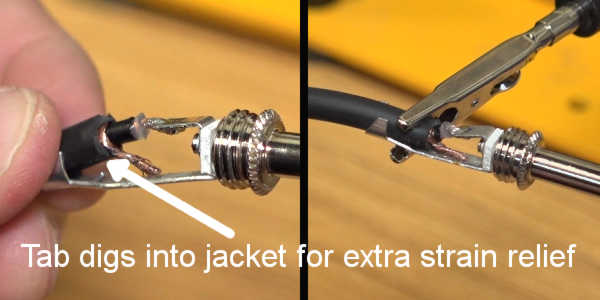
Then we flow solder onto the ground wire from above. The flux will draw the solder through the wire and onto the ground plate. We also slide the solder along the wire to keep the solder flowing throughout the entire length of the physical connection.

The result is a fully permeated solder joint covering the length of the ground wire, and bonded so well to the ground plate that you can physically pull fairly hard on the wire, and the wire will break long before the solder joint breaks.
Once again, it is important to clean the excess flux off at this point.
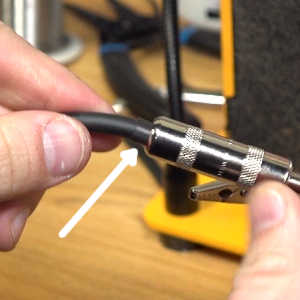
Finally, we clamp the cable clamps into place by squeezing them with pliers on a 45 degree angle. Not so tight as to cut into the jacket, but just tight enough to hold things in place. Now, the bulk of the work is done.
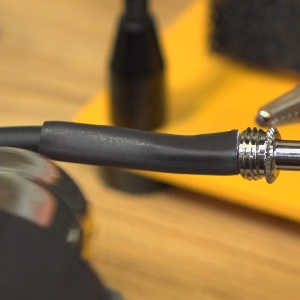
Then we slide the 3/8" heat shrink into place just behind the threads, and shrink it using the heat gun.
Next the plug's shield is slid into place and the body is threaded on as tight as possible. On customer cables we add a dab of thread-locker, but it isn't really necessary for light use cables. That's why I skipped this step for my cable. After the step, you'll see the heat shrink sticks out the back a bit. This helps with some strain relief and durability at the cable's exit.
The last piece of the puzzle is the outer 1/2" heat shrink. We slide it on all the way up to the point where the heat shrink's edge is flush with the flattest part of the plug. Too far forward and you'll affect the plug's function. Too far back, and you run the risk of the heat shrink sliding off over time with frequent cable use.

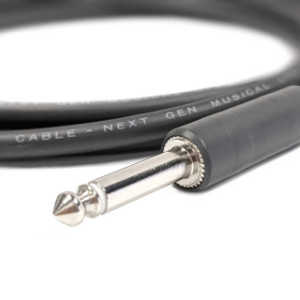
Finally, we shrink it into place on that plug end first, then the cable side. The extra length behind the plug adds even more strain relief. The result is a beautifully professional quality cable that you can rely on.
So, that's how we do it. You can buy the parts and do it the same way for a reasonable savings. Or, you can buy the cables we make that come with a lifetime warranty:
https://nextgenguitars.ca/products/next-gen-instrument-cable-mono-choose-length-ends.html
Build safe and build awesome!